


Welcome to InKing Royalty’s November Blog Hop! During this year’s blog hops, we are having fun with our stamping favorites – our favorite themes for seasonal cards and projects. This month’s projects feature pretty packages and beautiful tags to inspire your holiday gift-giving. We are excited to share our creations with you today! After you read my post, I hope you’ll hop over to the next person on the list at the base of this post.


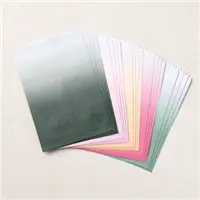
I like a stand-up flat bottom bag better than a flat gift bag so I experimented with how to convert the ombre gift bags to a flat bottom. I created my own shred for the inside and had fun decorating the outside.
Step by Step – Creating the Bag
- Use a paper trimmer to cut off the bottom of the Ombre gift bag. Score the bottom of the bag at 1″ across the bottom. Score at 1″ from each side up to the score line.
- Fold in the long sides, add liquid glue and then fold in the short sides. Hold tightly until glue sets.
- Cut two pieces of white cardstock to 2 x 2-1/2, one for the outside and one for the inside. Use liquid glue to adhere the bottom.
- To make the shredding inside the bag cut multiple 3 x 1/8″ strips of dsp and crinkle. Fluff them up and place in the bag bottom.


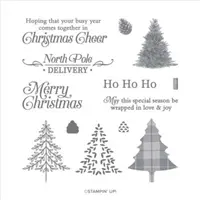
Step-by-step decorating the Package
- Stamp three trees from Perfectly Plaid using Evening Evergreeen Ink (now 15% off) and punch with tree punch.
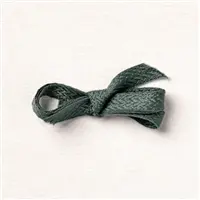
- Use the circle dies (now 20% off) and cut out Tidings Of Christmas DSP red stripe. Adhere the trees to the circle as shown, using dimensional on one. Adhere circle to front of package. Tie a piece of Chevron Evening Evergreen ribbon around the Package and adhere with glue dots.
- Stamp North Pole sentiment (masking off the swirls on the sides) in Versamark on Cherry Cobbler Cardstock (now 10% off) and heat emboss with white powder. Die cut the sentiment using the Tailor Made Tags (now 20% off). Note, I used the die twice, the first time the full length. The second time, I moved it up to shorten the actual tag length and die cut again. Die cut Tidings of Christmas dsp with smaller Tailor Made Tags. Tie the two tags together with white bakers twine and adhere to the ribbon.
- Use the small circle dies from Tailor Made Tags to cut two hole supports. Fold over the top of the bag, adhere the supports then use your Take Your Pick tool to put a hole thru the bag. Finish off with a piece of white bakers twine tied in a bow.
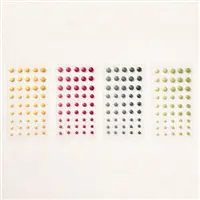
- Add Cherry Cobbler and Evening Evergreen Matte Decorative Dots as shown.

InKing Royalty Blog Hop Line-Up
Thank you for hopping along with us. If you get stuck during the Blog Hop, please use this line-up as a guide:- Brian King at Stamp with Brian
- Marilyn Jones at Stamp with MJ
- Ann Murray at Murray Stamps Ink
- Pam Morris at Tap Tap Stamp
- Jackie Beers at Blue Line Stamping
- Renae Novak at Blessed by Cards
- Candy Ford at Stamp Candy
- Jan Dufour at Stamp Me Silly
- Sue Jackson at Just Peachy Stamping
- Robin Myren at Songbird Designs by Robin
- Lynn Kolcun at Avery’s Owlery YOU ARE HERE
- Sheryl Sharp at Sharp Notes by Sheryl
- Lisa Graham at Lisa’s Little Ink Spots
Thanks for visiting my little portion of the Internet today. Click the button below to shop my online Stampin’ UP! store 24/7. If you have any questions, drop me an email at [email protected].
Buy Awesome StuffHappy Stamping
Lynn
If you enjoyed this post please be sure to…
- Check out my Gallery of Projects for more inspiration
- Save 10% on Product Bundles
- Check out the Clearance Rack and save up to 70%
- The $99 starter Kit is the Best Deal of ALL. Discounts & benefits Here
- Sign up for my Newsletter for information on Sales, classes, and Specials
Current Specials


Great idea with the bag! I love those anyway and now a new version to try!
Lynn, I love the way you altered the Ombré Bag to hold more items! Genius!
This is brilliant, Lynn! What a great idea to use products from the Annual Catalog.
I love it! So many great things you could fit inside that little bag! Love the trees and fun tag you added, too!
How clever! And gorgeous! All your details add so much “wow” to your project. Thanks for the great idea on the bags.
Yep, I am definitely CASEing this project. LOVE the bag hack, the shred and the outside focal dies.
Love the bag tutorial! Sweet little gift bag, love all of the sweet elements.
Fantastic bag tutorial, what a great idea!