Often I design my own projects but there is nothing wrong with admiring the work of others and recreating it in your own way. In the crafting world, we call this CASEing or Copy and Share Everywhere. if you are posting anything online you must be sure to give credit to your inspiration, that’s only polite and ethical. Today I’m sharing a card I created by Casing the Jul-Dec min catalog by Stampin’ UP!. You can find the sample on the inside of the front cover. Thanks, Stampin’ UP!

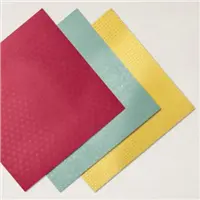
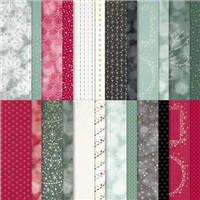
With every new catalog published, SU provides a list of supplies needed to recreate the samples. I love this service as sometimes I’m scratching my head trying to figure out how they did something. So I headed to my sample recipes first. The inside card portion of the project was easy enough to figure out but I needed a bit more info on how the pocket envelope was made. It called for two pieces of 6×6 DSP scored and adhered together. Since I use most all of my projects in my monthly stamp classes, using that much DSP wasn’t feasible. Instead, I used Cherry Cobbler cardstock and created my own, with just one piece of DSP on the front. All the measurements I used are down below.

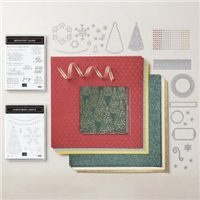
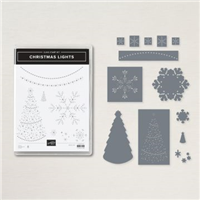
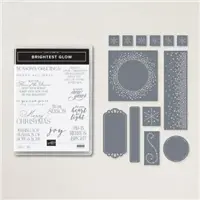
All the products I used today are included in the Lights Aglow suite found on pages 30-33 of the mini catalog. The snowflake from the Christmas Lights Bundle, the cutouts from Brightest Glow, and the paper from Festie foils and Lights Aglow DSP. There are several steps so let’s get to it
Case your own Lights Aglow Pocket Card
The card
- Very vanilla 5-1/2 x 4-1/4. Adhere a piece of the Gold Festive foils cut to 5-1/2 x 4-1/4 to the very vanilla. Cut a piece of Soft Succulent Lights Aglow to 5-1/2 x 4.
- Use the cut-out dies from the two die sets to create the peak through. Stamp snowflakes using Versamark and heat emboss with white powder. Adhere to the gold DSP with liquid glue.
- Stamp large snowflake on white cardstock with Versamark and heat emboss with gold powder. Crop with coordinating dies. Adhere to the card front with dimensional.
- Add some ribbon on top of the snowflake. SU used Real Red ribbon but I didn’t have any left so I opted for Soft Succulent. I find tear tape works beautifully to add ribbon.
- Stamp Merry Christmas Sentiment from Brightest Glow in Real Red on a piece of Very Vanilla and crop with the label die. Adhere to the card front with dimensional.
- Use some festive pearls to accent your card front.
The Pocket
Cut a piece of Cherry Cobbler cardstock to 9-1/2 x 6. Score on the long side at 4-1/2 and 9. Score on the short side at 1/4. Remove the portions shown. Fold and burnish on all score lines. Add tear tape to the bottom and right-scored area and fold and adhere. Add a piece of Lights Aglow DSP cut to 4-1/2 x 5-3/4 to the front of the pocket, then use the circle die from Brightest Glow to create the notch in the top. A

Don’t forget the inside
I stamped another sentiment and some snowflakes on the back panel of Very vanilla and left room for a message.

Thanks for visiting my little portion of the Internet today. Click the button below to shop my online Stampin’ UP! store 24/7. If you have any questions, drop me an email at [email protected].
Buy Awesome StuffHappy Stamping
Lynn
If you enjoyed this post please be sure to…
- Check out my Gallery of Projects for more inspiration
- Save 10% on Product Bundles
- Check out the Clearance Rack and save up to 70%
- The $99 starter Kit is the Best Deal of ALL. Discounts & benefits Here
- Sign up for my Newsletter for information on Sales, classes, and Specials
Current Specials