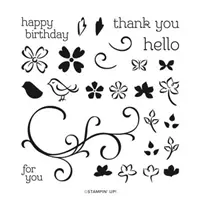
Way back when in 2013 when I first joined SU as a demo, there was a swirl stamp that I loved. Over time it was retired and I pretty much forgot about it, that is until the Jan-Jun mini catalog came out with Sentimental Swirl. Oh my, I’m in love again. This stamp set can be used for cute, whimsical or Elegant as I’m using it today. Let’s take a look.

I used a lot of techniques to make my background piece, including Heat embossing, blender brushes, dry embossing, stamping, and texturizing.
Background Step by Step
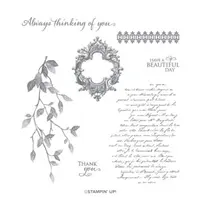
- Start off with a 4 x 5-1/4 piece of Hand Penned DSP and my Sentimental Swirl stamp along with Versamark and Shimmer White embossing powder (plain white would work just as well). Embosse the swirl once first, then stamp and embossed the swirl again. I couldn’t do them both at the same time because it was impossible to see where it was.
- Use a blender brush with Gorgeous Grape Ink and blend over the top of the swirls, but not on the entire panel. When finished, use a tissue and rub the panel to remove the ink from the embossing.
- Ink up the words from Very Versailles in Gorgeous Grape, stamp off on scratch paper then stamp in random areas on the panel. Stamp the filigree image from Very Versailles also in Gorgeous Grape and stamp on the panel.
- Run the entire panel through your die cut machine with the Time Worn Type embossing folder to give it some texture.
- Use your paper snips to rough up the edges of the paneel. It’s ok if it tears a little.
Card assembly
- Mount onto a 5-3/8 x 4-1/8 piece of basic white with dimensionals, then add both to a 8-1/2 x 5-1/2 gorgeous grape card base scored at 4-1/4.
- Punch several boughs from Vellum, Gorgeous Grape, and white using the Bough Punch.
- Stamp the sentiment from Peaceful Moments onto Gorgeous Grape with Versamark and heat emboss with white or Shimmer White.
- Punch this out with the Label me Fancy punch. Stamp the sentiment again with Gorgeous Grape on white and trim away the bottom.
- Add this to the sentiment with mini dimensional cut in half. Layer the sentiment and boughs together over a piece of Frayed white ribbon to finish your card.

Thanks for visiting my little portion of the Internet today. Click the button below to shop my online Stampin’ UP! store 24/7. If you have any questions, drop me an email at [email protected].
Buy Awesome StuffHappy Stamping
Lynn
If you enjoyed this post please be sure to…
- Check out my Gallery of Projects for more inspiration
- Save 10% on Product Bundles
- Check out the Clearance Rack and save up to 70%
- The $99 starter Kit is the Best Deal of ALL. Discounts & benefits Here
- Sign up for my Newsletter for information on Sales, classes, and Specials
Current Specials

JOINING DURING SALE-A-BRATION

Are you looking to get a great deal on Stampin’ UP products as well as a 20% discount on future purchases? Consider joining Stampin’ UP! and my team today. During Jan-Feb if you sign up as a Stampin’ Up! demonstrator during Sale-A-Bration, you’ll be able to pick two additional stamp sets for free after picking all of the products you want in your Starter Kit. The stamp sets need to be live at the time of picking them, so anything you see in a current catalog or at stampinup.com is eligible.
Answering Your Joining SU QuestionsChange My Life – Join Now