


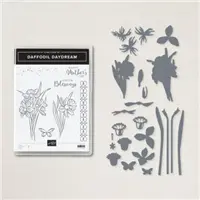
Unfortunately, we always need a few sympathy cards on hand, especially it seems this time of year. I decided to really explore the dies in the Daffodil Daydream Stamp/die bundle. I hadn’t played with them yet so here goes.

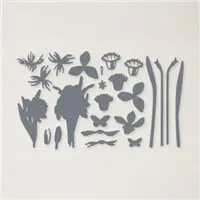
First of all, there are oodles of die included in this set and that can be intimidating but let’s break it down for you. There are four stem/leaf dies, those are pretty easy to figure out. Then there are the flower bits.

The flower on the left of my card was made with the pieces marked with 1. Each portion has a solid piece and a detailed piece. Use liquid glue to adhere the layers together individually then layer them together to form the bloom.

The flower on the right is made with the pieces marked with 2. Again layer the detailed pieces over the solid pieces them put the bloom together.

Finally, the easiest one is the little bud which has only two pieces but looks so good and adds so much to the card.
I know this can look overwhelming with all those dies but it isn’t too tough when you break it down to the smaller blooms. The other nice thing is that all the pieces can be die-cut at one time on a half sheet of cardstock and your die cut machine. You’ll probably want to run it through two times.
Other elements

The sentiment is from one of my all-time favorite stamp sets, Peaceful Moments – in the annual catalog. I loved this stamp set when it was released a year ago and my feelings haven’t changed. I reach for it a lot for great sentiments used all year round.
Once the blooms were created I laid them out on my table and arranged them into a bouquet with the stems and bud. I used a bit of liquid glue to adhere the stems together then used a piece of baker’s twine to tie around it. Adhere the entire bundle with liquid glue and dimensional to your card front.
I used the splatter stamp from the Daffodil Daydreams stamp set with Evening Evergreen on a piece of the retired Designer Series Paper from Eden’s Garden. It really added a lot of texture – without the bumps, to the card front.
My final touch was to use a daffodil watercolor pencil on the blooms. I made another version of this card and used my Light Daffodil Stampin Blend instead, also with great results. Both these coloring techniques were used to add just a little color to the blooms, but honestly, they look stunning in plain white.
Thanks for visiting my little portion of the Internet today. Click the button below to shop my online Stampin’ UP! store 24/7. If you have any questions, drop me an email at [email protected].
Buy Awesome StuffHappy Stamping
Lynn
If you enjoyed this post please be sure to…
- Check out my Gallery of Projects for more inspiration
- Save 10% on Product Bundles
- Check out the Clearance Rack and save up to 70%
- The $99 starter Kit is the Best Deal of ALL. Discounts & benefits Here
- Sign up for my Newsletter for information on Sales, classes, and Specials
Current Specials

JOINING DURING SALE-A-BRATION

Are you looking to get a great deal on Stampin’ UP products as well as a 20% discount on future purchases? Consider joining Stampin’ UP! and my team today. During Jan-Feb if you sign up as a Stampin’ Up! demonstrator during Sale-A-Bration, you’ll be able to pick two additional stamp sets for free after picking all of the products you want in your Starter Kit. The stamp sets need to be live at the time of picking them, so anything you see in a current catalog or at stampinup.com is eligible.
Answering Your Joining SU QuestionsChange My Life – Join Now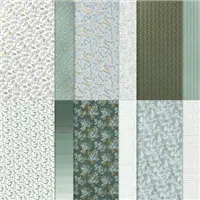


Thanks for showing the pictures to indicate which dies you used. That is super helpful! Beautiful card!
Your so welcome Terri. It took me a while to figure it out for myself so had to share with others.